Building a Secure JWT Authentication System in Node.js: A Comprehensive Guide
Introduction to JWT Authentication
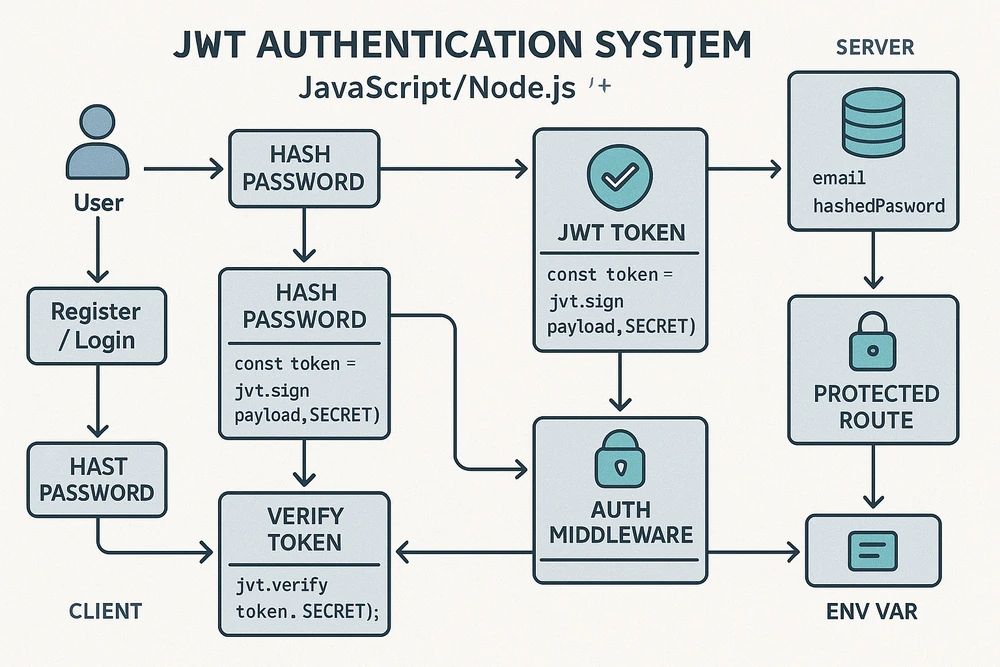
JSON Web Tokens (JWT) have become the backbone of modern authentication systems, offering stateless, scalable, and secure user management. Unlike traditional session-based authentication, JWT allows servers to offload user state data to tokens, reducing database overhead and enabling seamless scalability. In this guide, we’ll build a production-ready JWT authentication system using Node.js, Express, and MongoDB, covering everything from password hashing to refresh token rotation.
The Anatomy of JSON Web Tokens
At its core, a JSON Web Token (JWT) is a compact, URL-safe means of representing claims between two parties. These claims are encoded as a JSON object and digitally signed using a secret or public/private key pair. The structure of a JWT is divided into three distinct parts, each separated by a dot: the header, the payload, and the signature.
The header typically consists of two components: the type of token, which is JWT, and the signing algorithm being used, such as HMAC SHA256 or RSA. This information is Base64Url encoded to form the first part of the token. The payload contains the claims—statements about an entity (typically the user) and additional metadata. Claims can be registered (standard fields like iss for issuer or exp for expiration time), public (defined by those using JWTs), or private (custom claims specific to an application). It’s critical to avoid storing sensitive information in the payload, as JWTs are easily decoded by anyone who intercepts them.
The signature ensures the integrity of the token. It is generated by combining the encoded header, encoded payload, and a secret key (or private key, in asymmetric encryption), then applying the hashing algorithm specified in the header. This step is what makes JWTs trustworthy: any alteration to the token after it’s signed will invalidate the signature, alerting the server to potential tampering.
While JWTs are self-contained, this very property introduces challenges. For instance, tokens cannot be revoked before their expiration time without additional mechanisms, such as a token denylist or short-lived tokens paired with refresh tokens. This trade-off between statelessness and control is a key consideration when designing authentication systems.
Stateless Authentication: A Double-Edged Sword
One of the most lauded features of JWT-based authentication is its statelessness. Traditional session-based systems require the server to store session data in a database or cache, creating a dependency that complicates scalability. Every request in such systems must validate the session ID against this storage layer, introducing latency and potential bottlenecks.
JWTs eliminate this problem by embedding user identity and permissions directly within the token. The server need only validate the token’s signature and check its expiration time to grant access. This makes JWT ideal for distributed systems, microservices architectures, or applications where horizontal scaling is a priority.
However, statelessness comes with caveats. Since tokens are self-contained, they must include all necessary information for the server to make access decisions. This often leads to larger token sizes, which can impact performance when tokens are frequently transmitted over the network. Additionally, the inability to invalidate tokens mid-lifecycle means developers must implement creative solutions for scenarios like user logout or password resets. A common pattern is to use short-lived access tokens (e.g., 15 minutes) paired with long-lived refresh tokens. When a user logs out, the refresh token is revoked on the server, rendering both tokens useless once the access token expires.
Security Pitfalls and Mitigations
While JWTs are powerful, misconfigurations can expose applications to severe vulnerabilities. One notorious example is the none algorithm attack, where an attacker strips the signature from a token and sets the algorithm header to none, tricking poorly configured servers into accepting unsigned tokens. To prevent this, developers must explicitly specify the allowed algorithms during token verification.
Another common issue is token leakage through insecure storage. Storing tokens in browser localStorage makes them susceptible to cross-site scripting (XSS) attacks, where malicious scripts can exfiltrate tokens. Instead, tokens should be stored in HTTP-only cookies, which are inaccessible to JavaScript. For added security, cookies should be marked Secure and SameSite to prevent cross-site request forgery (CSRF) attacks.
Even with these precautions, developers must remain vigilant about token expiration times. Overly long expiration windows increase the risk of token theft and misuse. A balance must be struck between user convenience (avoiding frequent logins) and security. Implementing refresh tokens with strict server-side revocation policies can help mitigate this risk.
The Role of Middleware in Authentication
Middleware functions in Express.js act as gatekeepers for incoming requests, enabling developers to inject logic at specific points in the request-response cycle. In the context of JWT authentication, middleware performs two critical tasks: token validation and user context propagation.
When a request arrives at the server, the middleware first extracts the token from the designated storage location—commonly the Authorization header or an HTTP-only cookie. It then verifies the token’s signature using the secret key, ensuring it hasn’t been tampered with. If the token is valid, the middleware fetches the corresponding user details from the database and attaches them to the req object, allowing subsequent route handlers to access user data without redundant database queries.
This process, while seemingly straightforward, requires careful error handling. For instance, expired tokens should trigger a 401 Unauthorized response, prompting the client to attempt a refresh. Invalid or malformed tokens, on the other hand, warrant a 403 Forbidden response to signal a potential security breach. Middleware must also handle edge cases, such as tokens signed with incorrect algorithms or tokens missing required claims.
Token Refresh Strategies
Refresh tokens are the linchpin of a seamless user experience. Unlike access tokens, which are short-lived, refresh tokens have longer lifespans (days or weeks) and are used solely to obtain new access tokens. When an access token expires, the client sends the refresh token to a dedicated /refresh endpoint. The server validates the refresh token, checks its revocation status, and issues a new access token if all conditions are met.
To enhance security, refresh tokens should be rotated with every use. This means that each time a refresh token is exchanged for a new access token, the server invalidates the old refresh token and issues a new one. This practice limits the window of opportunity for an attacker to misuse a stolen refresh token.
Project Setup
Before diving into code, ensure you have Node.js and MongoDB installed. Create a new project directory and initialize it:
mkdir jwt-auth-system
cd jwt-auth-system
npm init -y
Install essential dependencies:
npm install express mongoose bcrypt jsonwebtoken cookie-parser dotenv
npm install nodemon --save-dev
Configuring the Express Server
Start by setting up a basic Express server. Create app.js:
const express = require('express');
const mongoose = require('mongoose');
const cookieParser = require('cookie-parser');
require('dotenv').config();

const app = express();

// Middleware
app.use(express.json());
app.use(cookieParser());

// Database connection
mongoose.connect(process.env.MONGO_URI)
  .then(() => console.log('Connected to MongoDB'))
  .catch(err => console.error(err));

// Routes
app.use('/api/auth', require('./routes/auth'));

const PORT = process.env.PORT || 5000;
app.listen(PORT, () => console.log(`Server running on port ${PORT}`));
User Model and Password Hashing
Create a User schema in models/User.js using Mongoose. Use bcrypt to securely hash passwords:
const mongoose = require('mongoose');
const bcrypt = require('bcrypt');

const userSchema = new mongoose.Schema({
  email: { type: String, required: true, unique: true },
  password: { type: String, required: true },
  refreshToken: { type: String }
});

// Hash password before saving
userSchema.pre('save', async function (next) {
  if (!this.isModified('password')) return next();
  const salt = await bcrypt.genSalt(10);
  this.password = await bcrypt.hash(this.password, salt);
  next();
});

module.exports = mongoose.model('User', userSchema);
Key Security Note: Always hash passwords before storing them. Plaintext passwords are a critical vulnerability.
Registration and Login Endpoints
Implement /api/auth/register and /api/auth/login routes in routes/auth.js:
Registration:
const express = require('express');
const router = express.Router();
const User = require('../models/User');
const bcrypt = require('bcrypt');
const jwt = require('jsonwebtoken');

// Register User
router.post('/register', async (req, res) => {
  try {
    const { email, password } = req.body;
    const userExists = await User.findOne({ email });
    if (userExists) return res.status(400).json({ message: 'User already exists' });

    const user = new User({ email, password });
    await user.save();
    res.status(201).json({ message: 'User registered successfully' });
  } catch (err) {
    res.status(500).json({ message: 'Server error' });
  }
});
Login:
router.post('/login', async (req, res) => {
  try {
    const { email, password } = req.body;
    const user = await User.findOne({ email });
    if (!user) return res.status(401).json({ message: 'Invalid credentials' });

    const isMatch = await bcrypt.compare(password, user.password);
    if (!isMatch) return res.status(401).json({ message: 'Invalid credentials' });

    // Generate tokens (explained next)
  } catch (err) {
    res.status(500).json({ message: 'Server error' });
  }
});
JWT Token Generation and Refresh Tokens
JWTs consist of three parts: header, payload, and signature. Use the jsonwebtoken library to generate tokens:
const generateAccessToken = (user) => {
  return jwt.sign(
    { id: user._id },
    process.env.ACCESS_TOKEN_SECRET,
    { expiresIn: '15m' }
  );
};
const generateRefreshToken = (user) => {
  return jwt.sign(
    { id: user._id },
    process.env.REFRESH_TOKEN_SECRET,
    { expiresIn: '7d' }
  );
};
// Inside login route
const accessToken = generateAccessToken(user);
const refreshToken = generateRefreshToken(user);

// Save refreshToken to user in DB
user.refreshToken = refreshToken;
await user.save();

// Set HTTP-only cookie
res.cookie('refreshToken', refreshToken, {
  httpOnly: true,
  secure: process.env.NODE_ENV === 'production',
  maxAge: 7 * 24 * 60 * 60 * 1000 // 7 days
});

res.json({ accessToken });
Store refresh tokens in the database and send them via HTTP-only cookies for security.
Middleware for Protected Routes
const protect = async (req, res, next) => {
  const token = req.cookies.refreshToken;
  if (!token) return res.status(401).json({ message: 'Unauthorized' });

  try {
    const decoded = jwt.verify(token, process.env.REFRESH_TOKEN_SECRET);
    const user = await User.findById(decoded.id);
    if (!user || user.refreshToken !== token) {
      return res.status(401).json({ message: 'Unauthorized' });
    }
    req.user = user;
    next();
  } catch (err) {
    res.status(401).json({ message: 'Invalid token' });
  }
};

// Example protected route
router.get('/profile', protect, (req, res) => {
  res.json({ user: req.user });
});
Security Best Practices
HTTP-Only Cookies: Prevent XSS attacks by storing tokens in cookies.
Environment Variables: Use dotenv to store secrets like JWT_SECRET.
Rate Limiting: Implement express-rate-limit to block brute-force attacks.
CORS: Restrict origins using cors middleware.
Testing and Deployment
Use Postman or Jest to test endpoints. For deployment:
Use helmet to secure headers.
Set up HTTPS with Let’s Encrypt.
Monitor logs with winston or morgan.
Conclusion
JWT authentication is a powerful tool for modern applications, but its security depends on proper implementation. By following this guide, you’ve learned to hash passwords, manage tokens securely, and protect routes effectively. Always stay updated with OWASP guidelines to mitigate emerging threats.