Developers and indie hackers have seen countless ChatGPT-style UIs spring up, but Local GPT Chat takes a different approach. It was built from the ground up as a no-frills, single-purpose interface for OpenAI’s API – open-source, super-simple to host, and delightfully unbloated. In a landscape where “[t]here are literally dozens of open source ChatGPT front-ends”, Local GPT Chat carves its niche by embracing minimalism. The creator specifically distilled the experience down “to keep boilerplate down to a minimum,” focusing only on conversation flow without extra fluff. The result is a clean, fast chat UI that just works – no login, no hidden fees, no extra fancy features getting in the way.
For the audience that craves simplicity and autonomy, Local GPT Chat is spot-on. It’s designed for technical users who prefer self-hosting their own tools. You spin it up on your machine or server (literally just serve an HTML file) and you’re in control of your data and configuration. As one overview of open-source chat UIs notes, modern alternatives shine by offering “privacy, flexibility” and self-hosted deployment – exactly what Local GPT Chat delivers. There’s no cloud lock-in or commercial dashboard. It’s essentially a static page plus JavaScript: lightweight, robust, and hackable. Everyone from startup founders to “tech-bro” tinkerers will appreciate that ethos.
Sleek, Focused UX – No Bloat Allowed
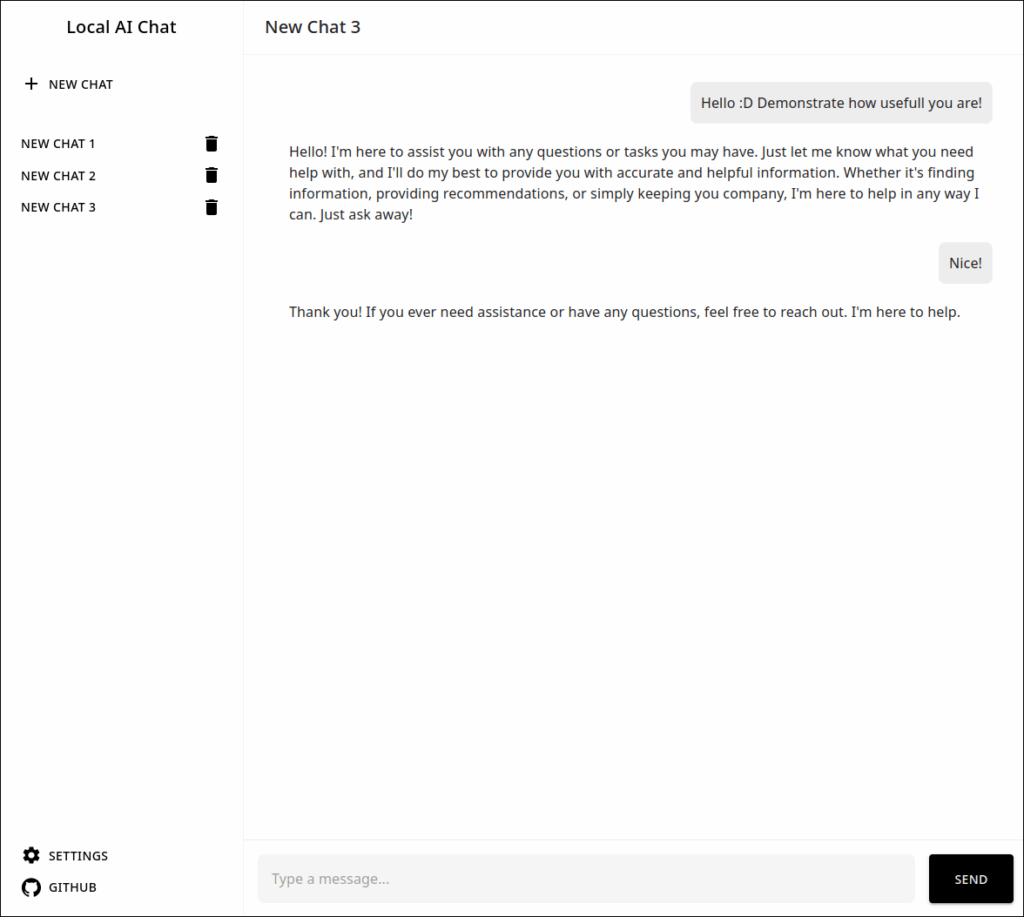
Local GPT Chat’s UI is as minimal as its code. Think a simple chat window: a text prompt area, a “send” button, and a stream of chat bubbles. No ads, no endless sidebars. (Imagine the official ChatGPT interface if you stripped out everything except the text area.) By keeping the interface laser-focused on chatting, it avoids feature creep. For example, there’s no built-in conversation history saving, no user accounts, no complex plugin system. Everything is purely client-side and session-based. This “keep it simple” philosophy mirrors other “no-build” projects that reject modern JavaScript frameworks in favor of vanilla code. In practice, it means lightning-fast load and easy auditing – you can inspect the code in seconds, and there’s nothing running except the bare essentials.
A chat interface illustrating the clean, streamlined design.
The input box and chat bubbles are all you get – zero distractions or bloat.

Under the hood, the app is just a handful of files: an index.html, a JavaScript file to handle the OpenAI calls, and a bit of CSS. It uses plain fetch() calls to talk to the API. Because every key design decision is about minimalism, there’s no backend server required. You simply clone the repo and point any static file server at it (or even open it directly in some browsers). The developer aimed to let the tool be used “for fun” and tinkering, trusting users to provide their own API tokens instead of trying to lock them out.
Solving the API Key Challenge
One of the trickiest problems was OpenAI API support in the browser. Official client libraries (like the Python or Node.js SDKs) can’t run in a web page out of the box – and exposing your secret key in a shipped app is a no-no. To work around that, Local GPT Chat lets you enter your OpenAI key manually. The key is stored securely in localStorage on your machine, so it never goes to anyone else’s server. This follows the recommended pattern: as the openai-web project puts it, “Don’t embed your API keys in the browser. Always ask the user for their API keys.”. In other words, you are the “server.” You paste your key into a little settings panel or prompt, and the app keeps it client-side.
Here’s a taste of the core JavaScript: on load it checks localStorage for an OPENAI_API_KEY. If none is found, it prompts the user:
export const openai = {
  async sendMessage(params: { apiKey: string, model: ChatGptModel, messages: OpenAIMessage[] }): Promise<string> {
    const response = await fetch('https://api.openai.com/v1/chat/completions', {
      method: 'POST',
      headers: {
        'Authorization': `Bearer ${params.apiKey}`,
        'Content-Type': 'application/json'
      },
      body: JSON.stringify({
        model: params.model,
        messages: params.messages
      })
    });

    if (!response.ok) {
      const error = await response.text();
      throw new Error(`OpenAI API error: ${response.status} - ${error}`);
    }

    const data = await response.json();
    return data.choices?.[0]?.message?.content ?? null;
  }
};
This snippet captures the essence: the user’s key lives safely in their browser, and each time you send a message, the app does a fetch POST to the OpenAI endpoint. (It’s essentially the same request a Node backend would make, but done in the browser.) Thanks to this design, the app avoids any server component altogether. As the developer notes, the “core functionality” is simply sending tokens to the model – so why not let the browser do it directly? This aligns with the guideline from the OpenAI community: if you must call their API client-side, do so with user-provided keys
One advantage: you can toggle your key anytime or even use multiple keys (no lock-in). And if OpenAI changes something (like adding browser CORS support in v4.0 as one project noted), Local GPT Chat can adapt, but for now it deliberately uses the simplest route.
Snapshots: The Interface in Action
While Local GPT Chat itself doesn’t have many fancy screens, imagine the experience: you open the app, type a prompt, hit Enter, and watch the response stream in like a real chat.
Every piece of the interface is designed to feel snappy. Messages appear with little to no delay (streaming results like ChatGPT does), and the whole window is responsive. The developer has even made sure it plays nicely on mobile – the CSS is so straightforward it adapts automatically. In short: if you prefer function over flash, you’ll feel right at home here.
Under the Hood & Getting Started
Local GPT Chat’s entire codebase is under GPL v3 and on GitHub. Inspecting it is trivial. The repo README (and comments in code) explain setup: basically, run docker and open url in a browser, enter your OpenAI key, and start chatting. For convenience, I suggest you can host it anywhere you like (GitHub Pages, a Raspberry Pi, your dev machine). Even if the “in-browser API call” may sound exotic, it’s no trick – the repo just bundles the openai-web-style pattern of using fetch. The only novel bit here is wiring it into the UI, which you can see clearly in the code.
Run docker:
docker run -d --name local-gpt-chat -p 3000:3000 ioalexander/local-gpt-chat:latest
Or see demo: https://local-gpt-chat-project.ioalexander.com/
Why This Matters
At first glance, a chat UI might seem trivial. But in practice many developers and indie teams do want something exactly like this: a lightweight, self-hosted front end for OpenAI. They might trust open source more, or have compliance requirements, or just hate subscribing to yet another SaaS dashboard. Local GPT Chat speaks directly to that crowd. It’s the embodiment of the DIY spirit in AI: bring-your-own-key, run-it-anywhere, view-it-once-and-exit.
As a final note, it’s worth reiterating why the project emphasizes “robustness” and simplicity. In the words of one tech writer reviewing chat front-ends: keeping a project minimal “keeps boilerplate down to a minimum”. That means fewer bugs, faster updates, and an interface you can customize or extend easily. If some other dashboard is a Swiss Army knife, Local GPT Chat is a laser scalpel – it does one thing (chat) and does it cleanly.
So whether you need a private playground to experiment with GPT, or you just appreciate clean code, check out https://github.com/ioalexander/local-gpt-chat/ on GitHub. It’s a refreshing take on the ChatGPT UI – small enough to audit in minutes, yet fully functional. Star it, fork it, or simply clone and run. Happy hacking!

Leave a Reply